My son just had a birthday. Of course there must be a cake. Some of the kids were asking for ice cream cake. Buying one is quite expensive. So, once again, I had to turn to Mr. Google to see if I could make one myself. This is what I came up with at the end: Oreo Ice Cream Cake.
It's pretty easy to make and the kids (plus friends) gave it a thumbs up.
Here's how I did it:
1. Baked a Lemon Cake. Of course I didn't do it from scratch. Just got a box of the shelves (Pillsbury). Most people use chocolate cake but the tangy lemon really blended nicely with my fudge topping.
2. Slice the cake into 2 layers so you can sandwich the ice cream in between. Put one layer at the bottom of your cake tray.
3. Crush a packet of Oreos. If you want more Oreos, just crush more. Mix it with your choice of ice cream. Vanilla, chocolate or Cookies N Cream flavor works well.
4. The ice cream has to be a little bit soft. Scoop out the ice cream and make a layer on top of the cake.
5. Put another layer of cake on top of the ice cream. Put back in the freezer so the ice cream hardens up.
6. Meanwhile, make some chocolate hot fudge . You can find a recipe that you like but I used this recepi:
1/2 cup sugar
1/2 cup corn syrup
1/4 cup cocoa powder
1/4 cup evaporated milk
1 1/2 tbs butter
7. Pour the chocolate hot fudge on top of the cake layer. Return the cake to the freezer.
8. Just before you serve the cake, top off the cake with swirls of whip cream. Add a little bit more crushed Oreos to that.
I hope my directions make sense. You're basically just putting one layer on top of another. Modify to your liking.
Leave a comment to tell me what you think.
We all want to be effective parents. There are many ways to accomplish that goal. This is my personal collection of tips and tricks to effective parenting. Power to the Parents!
Showing posts with label cooking and baking. Show all posts
Thursday, January 23, 2014
Tuesday, January 21, 2014
Easy Hot Dog Buns For School or Snack
One of my friends shared with me this fried hot dog bun after church and it was really yummy. My kids tell me that they sell it at the school canteen too (RM1 each). It is so easy to make and the kids love it. If you're out of ideas on what to pack for your kid's recess time, this is something to consider.
All you need is bread, hotdogs and a rolling pin. Just put the hotdogs (here we call them sausages) in boiling water to cook.
Use the rolling pin to flatten the bread. Place a hotdog on top of it and roll it up.
Fry it in oil. Make sure the oil is not too hot as it can get burned really fast. Add ketchup, chilli sauce or mayonnaise. Its also yummy just eating it plain.
Wednesday, October 23, 2013
Kuih Kosui Recipe
I learned how to make this Kuih Kosui from my mom's friend. She experimented with the recipe and finally found the right amount of ingredients that work. So, before I proceed to show you how make this yummy 'kuih', let me first say thanks to Aunty Karen Tam.
First thing you need to know is the cup that is used for measuring. It is not the standard cup but rather a standard coffee mug (like below). I did attempt to convert the recipe to the standard measurements. Unfortunately, I have lost that piece of paper where I noted down the conversion. So, until I get those measurements down again, just find a mug like below. And to tell you the truth, it really is easier just to measure with this mug when doing this recipe.
Ingredients A:
1 cup plain flour
1 cup tapioca flour
1/4 tsp salt
1/2 tsp Air Kapur (betel lime water)
3 cups pandan water (screwpine)
Ingredients B:
1 1/2 cups sugar (Mixture of white and brown sugar. Ratio of white:brown sugar depends on your preference. As for me, I just use 3-4 tbsp. of brown sugar)
1/2 cup water
Ingredients C:
100g grated young coconut (Here at my wet market, I just buy 1 packet which is RM1)
Pinch of salt
2. Add 3 cups of pandan (screwpine) water. Add little by little to initially make a paste. This way it is easier to smooth out the lumps. Once everything looks smooth (no lumps), add in the rest of the water.
How to make pandan water
What you do is take a few fresh leaves of pandan, cut into small pieces and put them in the blender. Add a little water and blend it. Strain to get just the juice. Give the pulp a squeeze to get more juice out. Then just add water to make 3 cups.
3. In a separate bowl, dissolve the sugar in 1/2 cup of hot water. Then add it into the flour and pandan mixture.
4. Last of all, add in about 1/2 - 1 tsp of 'air kapur'. You can get this ingredient at the Indian stores. I was told that you could substitute with alkaline water (Cantonese people call it "kan sui"). However, I have not tried it with any substitute. They say this ingredient helps to harden the 'kuih', so it is not soft and mushy.
5. Sift everything into a tray for steaming. The 'batter' is actually quite watery. I usually have lumps of 'kapur' in my sift. So I just smoothen it out on my sift.
6. Steam for 30 minutes. The more brown sugar you use, the more brown color your 'kuih' will be. After you steam, there will be some water on top of your layer of 'kuih'. Just pour it away.
7. Let cool completely. After cooling down, I like to put mine in the fridge for like 5 minutes. This is just to make the 'kuih' harden a little bit more.
8. Cut into squares and roll them in your grated coconut. Don't forget to add a little salt to your coconut first.
So far, I've only had praises for this recipe. Give it a try and tell me if it worked for you too.
Enjoy!
First thing you need to know is the cup that is used for measuring. It is not the standard cup but rather a standard coffee mug (like below). I did attempt to convert the recipe to the standard measurements. Unfortunately, I have lost that piece of paper where I noted down the conversion. So, until I get those measurements down again, just find a mug like below. And to tell you the truth, it really is easier just to measure with this mug when doing this recipe.
Ingredients
(Remember, the size of the 'cup' here is referring to the mug above. Please restrain from laughing :) )Ingredients A:
1 cup plain flour
1 cup tapioca flour
1/4 tsp salt
1/2 tsp Air Kapur (betel lime water)
3 cups pandan water (screwpine)
Ingredients B:
1 1/2 cups sugar (Mixture of white and brown sugar. Ratio of white:brown sugar depends on your preference. As for me, I just use 3-4 tbsp. of brown sugar)
1/2 cup water
Ingredients C:
100g grated young coconut (Here at my wet market, I just buy 1 packet which is RM1)
Pinch of salt
METHOD
1. Combine 1 cup of plain flour, tapioca flour and salt. Do not need to sift.2. Add 3 cups of pandan (screwpine) water. Add little by little to initially make a paste. This way it is easier to smooth out the lumps. Once everything looks smooth (no lumps), add in the rest of the water.
How to make pandan water
What you do is take a few fresh leaves of pandan, cut into small pieces and put them in the blender. Add a little water and blend it. Strain to get just the juice. Give the pulp a squeeze to get more juice out. Then just add water to make 3 cups.
3. In a separate bowl, dissolve the sugar in 1/2 cup of hot water. Then add it into the flour and pandan mixture.
4. Last of all, add in about 1/2 - 1 tsp of 'air kapur'. You can get this ingredient at the Indian stores. I was told that you could substitute with alkaline water (Cantonese people call it "kan sui"). However, I have not tried it with any substitute. They say this ingredient helps to harden the 'kuih', so it is not soft and mushy.
5. Sift everything into a tray for steaming. The 'batter' is actually quite watery. I usually have lumps of 'kapur' in my sift. So I just smoothen it out on my sift.
6. Steam for 30 minutes. The more brown sugar you use, the more brown color your 'kuih' will be. After you steam, there will be some water on top of your layer of 'kuih'. Just pour it away.
7. Let cool completely. After cooling down, I like to put mine in the fridge for like 5 minutes. This is just to make the 'kuih' harden a little bit more.
8. Cut into squares and roll them in your grated coconut. Don't forget to add a little salt to your coconut first.
So far, I've only had praises for this recipe. Give it a try and tell me if it worked for you too.
Enjoy!
Saturday, April 20, 2013
Minced Pork Balls in Sweet and Sour Sauce
Cooked this dish of minced pork balls in sweet and sour sauce the other day and it was a hit with my family. If you would like to try it out, here is the recipe.
Minced Pork
- Marinate your mince pork with salt, sugar, soy sauce, oyster sauce (and if you have, chicken marinate too). Let it sit at least for 1/2 hour.
- Add about 1 tbs cornstarch so the meat will stick when you roll them into balls.
- After rolling them into balls, fry in oil till cooked. Put your cooked meatballs aside.

- Saute the vegetables with garlic. Fry till cooked. Add in the sweet and sour sauce.
- 3tbs honey
- 2 tbs sugar
- Salt
- 2 tbs ketchup
- 1 tbs distilled vinegar
- (Optional - Lea and Perrins Worcestershire sauce)
Last Step
Mix the pork balls with the veges and sauce. Mix till everything is nicely coated. Dish out and serve.
Bon Apetite!
Monday, December 17, 2012
7 Days Christmas Menu Planner - Day 7
Okay, so we're on our last menu for your Christmas week.
DINNER
Christmas menu day 1
Christmas menu day 2
Christmas menu day 3
Christmas menu day 4
Christmas menu day 5
Christmas menu day 6
Okay, and we're done with our menu for 7 days of Christmas. I hope you have enjoyed it and found it helpful. Don't forget to tweet and share on Facebook if you've liked it.
I would also love to hear what you think. Leave me a comment and tell me what you're cooking for Christmas.
If you don't want to miss it, stay in touch through Google Friend Connect. You'll see the link on my side bar. OR click here to subscribe to my blog.
If you want me to send you the PDF for the whole 7 days Christmas menu, just email me at limailian [at] gmail [dot] com.
Menu For Christmas: Day 7 (29th Dec)
LUNCH- Turkey salad sandwiches. Use recipe for turkey salad.
- Oven baked sweet potato fries. Here's a good recipe.
DINNER
- Tacos. Give yourself a break and use a taco kit that includes shells, taco seasonings and taco sauce.
- Don’t forget the shredded lettuce, tomatoes, cheese and sour cream.
- For something a little extra, try this recipe for refried beans.
Christmas menu day 1
Christmas menu day 2
Christmas menu day 3
Christmas menu day 4
Christmas menu day 5
Christmas menu day 6
Okay, and we're done with our menu for 7 days of Christmas. I hope you have enjoyed it and found it helpful. Don't forget to tweet and share on Facebook if you've liked it.
I would also love to hear what you think. Leave me a comment and tell me what you're cooking for Christmas.
If you don't want to miss it, stay in touch through Google Friend Connect. You'll see the link on my side bar. OR click here to subscribe to my blog.
If you want me to send you the PDF for the whole 7 days Christmas menu, just email me at limailian [at] gmail [dot] com.
WANT TO KNOW HOW YOU CAN SAVE TIME AND MONEY?
PLAN YOUR MEALS.
Sunday, December 16, 2012
7 Days Christmas Menu Planner - Day 6
Menu For Christmas: Day 6 (28th Dec)
LUNCH- Ham and Bean Soup. Here’s a nice hearty recipe.
- Biscuits, using your biscuit mix.
DINNER
- Turkey tetrazzini. This highly-rated recipe uses egg noodles, for a delicious light texture.
- Salad
- Brown and serve rolls
Here are the past days menu:
Christmas menu day 1
Christmas menu day 2
Christmas menu day 3
Christmas menu day 4
Christmas menu day 5
If you want me to send you the PDF for the whole 7 days Christmas menu, just email me at limailian [at] gmail [dot] com.
Saturday, December 15, 2012
7 Days Christmas Menu Planner - Day 5
Menu For Christmas: Day 5 (27th Dec)
LUNCH- Turkey club tortilla roll-ups. Here are some guidelines to put yours together.
- Cut fresh fruit
DINNER
- Don’t let that ham go to waste, try this ham casserole.
- Corn muffins are simple to make with this recipe.
We have 2 more days of Christmas menu. Stay tuned.
Don't forget, you can get this menu planning resource pack for free. Just click the banner below.
If you don't want to miss future postings, stay in touch through Google Friend Connect. You'll see the link on my side bar. OR click here to subscribe to my blog.
Here are the past days menu:
Christmas menu day 1
Christmas menu day 2
Christmas menu day 3
Christmas menu day 4
If you want me to send you the PDF for the whole 7 days Christmas menu, just email me at limailian [at] gmail [dot] com.
Friday, December 14, 2012
7 Days Christmas Menu Planner - Day 4
26th December, the day after Christmas, is a time to relax and unwind. The BIG Christmas dinner is over and done with. If you still have to cook something, why not do something with the leftovers.
LUNCH
DINNER
Don't forget to come back for tomorrow's menu - Christmas Day 5
If you don't want to miss it, stay in touch through Google Friend Connect. You'll see the link on my side bar. OR click here to subscribe to my blog.
Here are the past days menu:
Christmas menu day 1
Christmas menu day 2
Christmas menu day 3
If you want me to send you the PDF for the whole 7 days Christmas menu, just email me at limailian [at] gmail [dot] com.
Menu For Christmas - Day 4 (26th Dec)
LUNCH
- Use your leftover ham to make grilled ham and cheese sandwiches
- French fries
DINNER
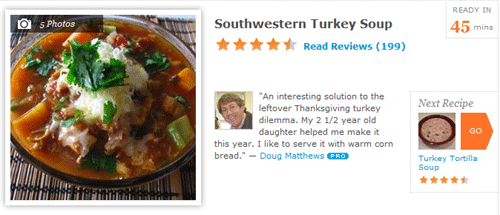
- For a change from regular turkey soup, try this Southwestern turkey soup recipe.
- Using your leftover mashed potatoes, make pan-fried potato cakes.
MAKE YOUR LIFE EASY
If planning meals and writing grocery lists week in and week out isn’t your cup of tea, go to Menu Planning Central and claim your free menu planning guide and printable meal plans.
You'll want to check out their Special Holiday Bundle. 11 holiday resources for you (plus 3 bonuses) that I know you are going to LOVE! Included are recipes and tips that are bound to make your holiday season a bit easier.
Don't forget to come back for tomorrow's menu - Christmas Day 5
If you don't want to miss it, stay in touch through Google Friend Connect. You'll see the link on my side bar. OR click here to subscribe to my blog.
Here are the past days menu:
Christmas menu day 1
Christmas menu day 2
Christmas menu day 3
If you want me to send you the PDF for the whole 7 days Christmas menu, just email me at limailian [at] gmail [dot] com.
Thursday, December 13, 2012
7 Days Christmas Menu Planner - Day 3
CHRISTMAS DAY MENU
LUNCH- Bacon, Lettuce and Tomato (BLT) sandwiches. They're easy to make and you can pre-cook the bacon and chop up the lettuce and tomato ahead of time. Then, let everyone assemble their own sandwiches.
- Baby carrots with ranch dressing
DINNER
- Ham. A cooked ham is such a simple thing to make. You can heat it up as is or mix some honey and Dijon mustard to make a delicious glaze.
- Roasted turkey breast. Just use a breast, if you don’t have a big crowd.
- Mashed potatoes, gravy and cranberry sauce.
- Stuffing…you can make it from scratch, but don’t stress yourself out too much. The boxed kind is usually a crowd pleaser.
- Broccoli cheese casserole. Here’s an absolutely delicious one.
- Ask your guests to bring a vegetable dish or check out this site for vegetable dish ideas.
DESSERT IDEAS
You can purchase delicious premade desserts from the bakery to save time, or if you’re ambitious, try these ones.
Come by for tomorrow menu, Christmas Day 4
You'll find the past day menus here:
Christmas menu day 1
Christmas menu day 2
If you don't want to miss it, stay in touch through Google Friend Connect. You'll see the link on my side bar. OR click here to subscribe to my blog.
If you want me to send you the PDF for the whole 7 days Christmas menu, just email me at limailian [at] gmail [dot] com.
Here's an e-book that is most appropriate for the holiday season. Get it for free.
Wednesday, December 12, 2012
7 Days Christmas Menu Planner - Day 2
When it comes to cooking, having a plan takes a bit of headache out of the chore. What more with Christmas when the family is all together. You don't want to be so stressed out that you can't enjoy family time.
Here's a suggested menu for your Christmas eve.
Menu For Christmas: Day 2 (24th Dec)
LUNCH
- English muffin pizzas. You'll find the recipe here, but you can use whatever ingredients you have on hand for toppings.
- Green salad. Use bagged and washed salad mix to save time.
DINNER
- Chicken breasts with lime sauce. Here's a simple recipe and you can even use bottled lime juice if you don't have fresh lime on hand.
- Rice
- Vegetable medley
- Brown and serve rolls
Come back tomorrow for Christmas menu day 3. If you don't want to miss it, stay in touch through Google Friend Connect. You'll see the link on my side bar. OR click here to subscribe to my blog.
If you want me to send you the PDF for the whole 7 days Christmas menu, just email me at limailian [at] gmail [dot] com.
Tuesday, December 11, 2012
7 Days Christmas Menu Planner - Day 1
What's cooking for Christmas? It can be mind boggling trying to put together a menu for the Christmas week. Here are just some ideas to ease your holiday burden. Take a look at this nutritious yet simple menu for the week of Christmas. It’s designed to save you time, stretch ingredients and help make use of Christmas leftovers.
Click the banner below to
Claim your Free Menu Planning Basics Report and Printable Resources right now
Menu for Christmas: Day 1 (23rd Dec)
LUNCH- Tomato soup
- Grilled cheese sandwiches
DINNER
- Slow cooker beef and mushroom stew. Get the recipe here and substitute baby carrots to save prep time.
- Cheese garlic biscuits. These are made using a biscuit mix to save you time.
- Baked potatoes.
If you don't want to miss it, stay in touch through Google Friend Connect. You'll see the link on my side bar. OR click here to subscribe to my blog.
If you want me to send you the PDF for the whole 7 days Christmas menu, just email me at limailian [at] gmail [dot] com.
Wednesday, December 05, 2012
Baking Time: Lemon Bars
My daughter went out shopping with my mom the other day and came home with a bag of lemons. Happily she suggested we make.... lemon bars.
Since it is the school holidays, baking is one way to keep the kids busy. So we gather together the ingredients we needed and got to work.
So nice to have kids that can help lighten the load. My eldest daughter did the measuring, sifting and juicing.
This little girl enjoyed playing with the flour. She liked smoothing it out with a spoon.
And this is the result... yummy lemon bars. Almost forgot to take a picture of it. Last few pieces left.
So, do you want the recipe? Here it is:
LEMON BAR RECIPE
BOTTOM BASE
- 1/2 cup sugar
- 2 cups flour
- 225g butter
Blend flour, sugar and butter together. (Let butter soften at room temperature.)
Press into a 9x13 inch pan.
Bake 350 degress Celsius for 15-20 minute.
TOP FILLING
- 1 tsp lemon rind (I used lemon rind from 2 lemons)
- 1/4 cup fresh lemon juice (Maybe a bit more if you want it to be more tangy).
- 4 eggs
- 1/4 cup flour mixed with 2 cups of sugar (I cut down the sugar to only 1 cup actually).
Mix flour and sugar together.
Add lemon juice, eggs and grated lemon rind.
Mix together with a mixer (Not necessarily need to use a mixer. I mixed mine by hand).
Pour lemon mixture over cookie mixture (the bottom base) and return to oven.
Bake 15-20 minutes until lemon mixture is set.
ENJOY!!!
Thursday, October 11, 2012
Loh Shu Fun Noodles
At least one day of the week I will cook noodles. My kids like it dry but my DH likes it with soup. No problem, both can be done.
Loh Shu Fun with "kicap" sauce
Loh Shu fun with soup
To make the soup I bought 2 chicken carcass to boil. Throw in some garlic and big onion for extra taste. Marinated some minced pork with salt, sugar, soy sauce and oyster sauce. Add a little corn starch to make it stick when I drop them in the soup like meatballs.
To make the "kicap" sauce, I used light soy sauce, dark soy sauce, pork lard oil (can be substituted with garlic oil), fish sauce and oyster sauce.
For noodles, I will usually buy "kuey teow" or "loh shu fun" (rat's tail noodle). The 'loh shu fun" I will buy both short and long ones. More choice for my family.
Extra ingredients include 'taugeh' (beansprouts), pork ball or fish ball, quails eggs, fried garlic and shallots (very important), spring onions and cilantro (Chinese call 'yin sai', but usually I'm the only one who eats that).
It doesn't take much effort to cook this. That's why I have this once a week. Need some light cooking days so I don't burn out :)
What do you cook when you want a light and easy cooking day?
Thursday, October 04, 2012
Mee Jawa
I had kept some prawn shells in the freezer to make prawn stock and so, I thought it was time to make some Mee Jawa. Turned out very nice, a bit too spicy for my taste coz' I added in too much red chilli. Next time, I will reduce the chilli so my kids can enjoy it too.
So this time, only the adults enjoyed it. For the kids, I made "kicap" sauce for them. My kids had to stay back in school for co-curriculum activities so I packed the noodles for them. Added in some fried garlic, fried shallots, spring onion, 'taugeh' (beansprout) and fishball. "Kicap" sauce was really simple: light soy sauce, dark soy sauce, pork lard oil (can substitute with garlic oil instead), fish sauce, oyster sauce and a dash of pepper.
Okay, back to Mee Jawa. You pretty much just have to prepare the sauce and the 'extras' that you want to put on your yellow noodles. My 'extras' include fried tauhu (sliced), hard boiled eggs, prawns, potatoes (boiled), taugeh (beansprouts), spring onions, fried garlic and shallots. Oh, and lime. You must squeeze lime onto your noodles for that extra 'oomph' taste.
My mom had shredded some cucumber. That was quite a nice addition too. My DH wanted to put in the 'tikus' and crunchy keropok thing that you find in mamak rojak. Unfortunately, I don't know where to get those.
Okay, now for the recipe which I got from kuali.com
INGREDIENTS
1 kg yellow noodles
1 kg medium prawns
500g sweet potatoes, mashed
2-3 heaped tbsp cornstarch
1/2 cup oil
Salt and pepper
2.5liter water
PASTE (Blend)
3 stalks lemon grass
6 shallots
4 pip garlic
4 cm ginger
4 cm galangal
5 red chillies
PRAWN STOCK
Boil prawns in 2.5 liter water.
When prawns are cooked (which is fairly quick, don't boil too long or they'll shrink and be hard), remove them.
Shell the prawns and throw the shells back into the pot to make the prawn stock. Throw in whatever prawns shells you've been keeping in the fridge.
Continue boiling for about 30 minutes.
Discard the shells.
DIRECTIONS
Heat up oil in the wok and fry the paste until fragrant.
Add it to your prawn stock, let it simmer.
Stir in the mashed sweet potatoes.
Add in cornstarch to thicken the sauce. Make sure you add a little water to the cornstarch first before putting it into the sauce. Don't throw in the cornflour powder into the pot or you'll get lumps.
Season with sugar and salt.
ENJOY!
Monday, September 03, 2012
Back-to-school meals made easy with grapes
Kids and families getting ready for busy mornings are in need of healthy, energy-packed foods to fuel tightly scheduled and sometimes hectic lifestyles. Start the morning with a Breakfast-to-go Smoothie, a blend of fruit, yogurt and crunchy cereal for a hearty breakfast. Kids - and probably you too - will relish this satisfying and yummy drink featuring grapes and grape juice, both of which, according to mounting research evidence, may help support a healthy heart.
Bulgur Salad with Grapes and Kale is also a hearty, very nutritious and delicious meal all by itself, and perfectly packable for bring-from-home lunches. Grapes are really the key to making this salad inviting and flavorful for all ages. The sweet accents and the crisp qualities of the grapes offer a nice contrast to the chewy bulgur, crunchy nuts and shredded kale, which doesn't go limp like most lettuce will.
Make a big bowl or container of this salad and have it at the ready for a mini-meal for students going through a growth spurt or who need more calories in general, such as athletes, dancers, marching band members, etc. Adventurous little eaters will also enjoy munching on this salad during lunch or snack breaks at day care or preschool. And don't forget to pack a cluster of grapes, too, for more sweetness and good health during the day.
Having a bowl of fresh grapes handy for nibbling after school is a great alternative to chips, cookies and the array of mini-pizzas and hand-held manufactured foods that are generally expensive and high in fat and salt.
Grapes are considered a super snack for a variety of reasons: Grapes contain just 90 calories per 3/4 cup serving, are packed with flavor and sweetness, and create virtually no mess - no peeling, no slicing, no coring. In addition, all colors of grapes contain natural plant components known as polyphenols, which recent scientific studies suggest may help protect and maintain healthy cells.
Back-to-school may mean families are heading away from summer fun, but make it easier and a bit brighter with the sweet juicy taste of grapes.
Breakfast-to-go Grape Smoothies
Ingredients:
1 1/2 cups frozen California grapes
1 banana, sliced
1/2 cup vanilla or honey low-fat Greek yogurt
1/2 cup grape juice
1/4 cup wheat flake cereal
Directions:
Combine all the ingredients in a blender and blend for 1 minute. Serve immediately. Makes 2 1/3 cups of smoothie.
Nutritional analysis per serving: Calories 251; Protein 6 g; Carbohydrate 57 g; Fat 1.5 g; 5 percent calories from Fat; Cholesterol 2 mg; Sodium 47 mg; Fiber 3 g.
Bulgur Salad with Grapes and Kale
Ingredients:
1 cup bulgur
Kosher salt
1 cup pecan halves, toasted and roughly chopped
2 cups halved seedless California grapes
2 cups packed finely slivered kale or Swiss chard leaves
1/2 cup chopped Italian parsley
1/4 cup thinly sliced scallions
1/4 cup lemon juice
2 tablespoons extra-virgin olive oil
2 teaspoons finely grated lemon zest
Pinch cayenne
Black pepper
Directions:
Bring 2 cups of water to a boil in a medium saucepan. Stir in the bulgur and 1/2 teaspoon salt and remove from the heat. Cover and let stand 20 minutes or until most of the water has been absorbed. Drain well and press to extract any excess water. Let cool and stir in the remaining ingredients. Season well with salt and black pepper. Serve room temperature or chilled.
Nutritional analysis per serving: Calories 289; Protein 5.8 g; Carbohydrate 33 g;
Fat 17 g; 50 percent calories from Fat; Cholesterol 0 mg; Sodium 181 mg; Fiber 7.3 g
Grapes from California are available May through January. For more information, go to www.grapesfromcalifornia.com or facebook.com/grapesfromcalifornia.
Wednesday, July 25, 2012
Braised Pork Belly with Gula Melaka
This is what we had yesterday... another experiment: Braised Pork Belly with Gula Melaka (Palm Sugar).
Found the recipe here.
I didn't know how it was going to taste. But in the end, it was really nice. My little girl really liked it and even had 2 helpings of rice for lunch. She kept asking for more of the pork belly. This is the little girl that would usually chew meat and spit it out, and throw half her rice away. Yesterday, she ate everything up.
I didn't cook it as dry as the original recipe coz' I know my family loves gravy. The sweet and slightly sour taste of the gravy goes very nicely with rice. Okay, so here is the recipe:
Ingredients
- RM12 worth of pork belly (that's a little under 1kg)
- 1 tbsp of preserved bean paste (tau cheong)
- 8-10 shallots, sliced (I like lots of shallots, you can reduce this if you want)
- 2 chilli padi/bird eye chillies, cut (I didn't put this in because of the kids but DH says next time I mustn't omit)
- Gula melaka/palm sugar - Original recipe said to put in 25g. Sorry, I don't know how to measure it. So I just boiled like 3 blocks which I had with a little bit of water to melt it. I think I added about 6 spoonfuls (tbsp) when I was cooking. If you're not sure, just put less first. Before you're done cooking, just have a taste. If you don't think it is sweet enough (need to balance with the sour assam), just add some more.
- 2 tsp light soya sauce
- 1 tsp dark soya sauce
- 3 pieces tamarind skin
- 1 cup water
- Marinate pork belly with salt. I did mine overnight but 1 hour is good too.
- With some cooking oil, fry the shallots and bean paste.
- When it is fragrant, add in pork belly and fry for a bit.
- Add in water, gula melaka, light soy sauce, dark soy sauce and tamarind skin.
- Turn heat down to low and let simmer. Cover the wok.
- Do a taste test and adjust accordingly.
Friday, July 13, 2012
Guess What's Cooking?
I thought I'd do something fun today. Take a look at the picture above and guess what dish I'm going to cook.
List of ingredients:
.
.
.
.
.
.
.
.
(Update)
And the answer is... Wat Tan Hor / Kuey Teow Cantonese Style
List of ingredients:
- Oil from pork fat
- Lean pork
- Green mustard (choy sum/sawi)
- Prawns
- Chicken stock
- Garlic - minced
- Eggs
- Flat noodles (Hor Fun/Kuey Teow)
- Corn Flour (To thicken the grave, hint! hint!)
.
.
.
.
.
.
.
.
(Update)
And the answer is... Wat Tan Hor / Kuey Teow Cantonese Style
Friday, July 06, 2012
Vietnamese Noodle Salad
This is what we are eating today: Vietnamese noodle salad.
I admit that it is not very authentic but it is yummy.
Last Saturday, I had a church activity and a vietnamese sister prepared all the ingredients to make a vietnamese spring roll. She taught us how to put it together and roll everything up. However, we were in a small room and space was limited. So we all had to take turns to prepare our own roll. Some of us very hungry ones (including me) decided to skip the "rolling" part and just put everything on our plate and started eating... like a noodle salad. And so that is what's on my menu today.
Here's a quick look at my recipe.
Ingredients:
Oh, feel free to add whatever other ingredients you like. This is a pretty versatile dish. For example, instead of chicken, you could do pork chops.
p.s. Another Vietnamese roll recipe - I did this in 2008. Check out the ingredients I used then.
I admit that it is not very authentic but it is yummy.
Last Saturday, I had a church activity and a vietnamese sister prepared all the ingredients to make a vietnamese spring roll. She taught us how to put it together and roll everything up. However, we were in a small room and space was limited. So we all had to take turns to prepare our own roll. Some of us very hungry ones (including me) decided to skip the "rolling" part and just put everything on our plate and started eating... like a noodle salad. And so that is what's on my menu today.
Here's a quick look at my recipe.
Ingredients:
- Chicken leg
- Vietnamese noodle (Found in Tesco in the area where they sell "bihun". This one had vietnamese words on the packaging, so I assume it is vietnamese noodle).
- Cabbage (shredded)
- Carrot (shredded)
- Taugeh or bean sprouts. I bought Ipoh taugeh.
- Prawns
- Mint leaves
- 3 tbsp fish sauce
- 1 1/2 tbsp sugar
- 2 cloves garlic finely chopped
- Juice from 1 lime
- 1 lemon grass, chopped and pounded
- 3 tbsp water
- When I followed the sauce recipe above, it was not enough for me. So if you need more, just add more water, fish sauce, sugar and lime juice. Experiment a little and try to get that balance of sweet, salty and sour.
- With the chicken, I rubbed some salt on and let it sit for a while. Before frying each piece, I first dipped it into some egg and then coated with corn flour. I usually end up burning my chicken when I fry them. So now, what I do is fry them for about 5 minutes and then pop them all into the oven to bake until cooked (about 45 minutes). Comes out perfect this way. Chop the chicken into bite size when it is done.
- Soak the Vietnamese noodle in water until soft. I quickly blanched them in hot water to cook it. Drain and set aside.
- Shred and cabbage and carrot like you're doing coleslaw. Set aside.
- Peel and wash the prawns. Cook in boiling hot water. Take out and set aside.
- When it is time to eat, just put everything onto your plate/bowl and add the sauce.
Oh, feel free to add whatever other ingredients you like. This is a pretty versatile dish. For example, instead of chicken, you could do pork chops.
p.s. Another Vietnamese roll recipe - I did this in 2008. Check out the ingredients I used then.
Monday, May 28, 2012
Steamed Chinese Cabbage Rolls
I followed this recipe for Steamed Stuff Chinese Cabbage Rolls from 3hungrytummies. All my kids give it the thumbs up. My younger son has requested that I cook it again. I am glad they love it because I wasn't sure if they would eat the chinese cabbage. However, they gobbled up everything happily.
Okay, so there are 3 parts to preparing this dish. First you have to prepare the mince meat. It is a combination of minced pork and prawns. Then you have to prepare the chinese cabbage. You have to boil it first to get it soft. Spoon the mince meat onto the cabbage leaf and roll it up. Steam it for about 10-15 minutes. The last part is to prepare the sauce to pour over the cabbage.
Not terribly difficult to do. For the full recipe, visit the link to 3hungrytummies above. I don't want to take away her thunder. Heheheh. She's got pictures to show you how to do it too. Enjoy!
Friday, May 25, 2012
How To Cook Lotus Roots
I love lotus roots. However, the only way I've ever cooked it is in soup.
Well, DH once again passed to me a newspaper clipping of a recipe. This time it is for LOTUS ROOTS WITH FRAGRANT SAUCE. It tastes okay. I think next time, I will blanch the lotus roots first. I prefer it a little bit softer. Maybe I'm just used to having it soft like in soup. Also, I found the color of my dish is different from the picture in the newspaper. Mine looks more brown whereas the pix in the paper, the lotus root looks more yellow. Do you guys have the same experience of having your dishes NOT look like the pictures of the recipes you follow?
I am trying to locate the original recipe online but can't seem to find it. Well, here it is for your convenience:
LOTUS ROOTS WITH FRAGRANT SAUCE
INGREDIENTS:
SAUCE INGREDIENTS:
HOW TO COOK:
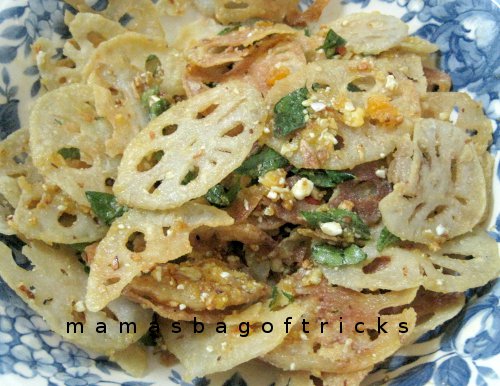
Here's another recipe that I tried today: LOTUS ROOT WITH SALTED EGG (Kam Heong Lotus Root)
I've had this before in a restaurant in Kepong. Absolutely fell in love with it. The lotus roots are crispy and the blend of garlic, curry leaves and salted egg is just heavenly. Have been wanting to replicate the dish at home and finally, I did. If you love the taste of salted eggs, you'll love this dish. I got my directions on how to cook this dish here.
Here's the recipe.
LOTUS ROOT WITH SALTED EGG
INGREDIENTS:
Frying the Lotus Root
Well, DH once again passed to me a newspaper clipping of a recipe. This time it is for LOTUS ROOTS WITH FRAGRANT SAUCE. It tastes okay. I think next time, I will blanch the lotus roots first. I prefer it a little bit softer. Maybe I'm just used to having it soft like in soup. Also, I found the color of my dish is different from the picture in the newspaper. Mine looks more brown whereas the pix in the paper, the lotus root looks more yellow. Do you guys have the same experience of having your dishes NOT look like the pictures of the recipes you follow?
I am trying to locate the original recipe online but can't seem to find it. Well, here it is for your convenience:
LOTUS ROOTS WITH FRAGRANT SAUCE
INGREDIENTS:
- 400g lotus roots, cut into slices
- 1 onion, quartered
- 50g red capsicum, cut into strips
- 1 stalk spring onion, cut into 2.5cm lengths
- 8 dried chillies, cut into halves (I didn't want it so spicy because of the kids, so I just put in 1-2).
- 6 slices ginger
- 2 tbsp sesame oil
SAUCE INGREDIENTS:
- 1 tsp light soy sauce
- 1 tbsp oyster sauce
- 1 tbsp tomato sauce
- 1 tbsp black vinegar
- 1 tbsp sugar
- 1/4 tsp chicken stock powder
- 125ml fresh chicken stock
- 2 tbsp cornflour
HOW TO COOK:
- Heat up sesame oil in your wok. Saute dried chilli until fragrant.
- Add in ginger slices and onion. Stirfry for a while.
- Add lotus roots and pour in the sauce.
- Let it boil. Then add the capsicum and spring onion.
- Stirfry to combine everything.
Here's another recipe that I tried today: LOTUS ROOT WITH SALTED EGG (Kam Heong Lotus Root)
I've had this before in a restaurant in Kepong. Absolutely fell in love with it. The lotus roots are crispy and the blend of garlic, curry leaves and salted egg is just heavenly. Have been wanting to replicate the dish at home and finally, I did. If you love the taste of salted eggs, you'll love this dish. I got my directions on how to cook this dish here.
Here's the recipe.
LOTUS ROOT WITH SALTED EGG
INGREDIENTS:
- 1 lotus root. This dish above was from 1 lotus root as long as a pen. Slice it as thin as possible.
- Curry leaves
- 3-4 salted eggs.
- Minced garlic.
- Butter
- Red chilli, sliced thin. If your kids don't like chilli, maybe just use half a chilli or omit it entirely.
- 2 parts rice flour to 1 part corn flour
Frying the Lotus Root
- After you slice the lotus root, boil it in a mixture of water and vinegar for about 5 minutes. Apparently it is suppose to stop the root from turning brown.
- Drain the lotus root and pat dry with kitchen towel.
- Mix rice flour and corn flour together. The recipe I looked up uses tapioca flour. I didn't have that so I used rice flour-corn flour as it will also make the lotus roots crispy when fried.
- Coat the lotus roots with the flour mixture and then fry them in oil. Don't have to wait until it turns golden brown before taking them out. When I did that, the chips ended up a bit burnt and tasted bitter. Take them out as they are about to turn brown. You'll see that it will continue to cook after you take them out and you'll have that nice golden brown color after all.
- Put aside your lotus root chips.
- According to the recipe I looked up, you crack the salted egg and scoop out just the yolks. After that you steam the yolks. I don't like the idea of wasting the egg whites. So what I did instead was leave the eggs uncracked and boiled them until cooked (like hard boiled eggs). After it was cooked, I just cut the eggs in half and scooped up the yolks. Egg whites can be eaten by anyone who wants to.
- Mash the egg yolks.
- Fry the garlic with butter. Add in curry leaves and chilli. Fry till fragrant.
- Add in the mashed egg yolks.
- Toss in the lotus root chips and mix well.
- Add sugar and salt to taste.
Subscribe to:
Posts (Atom)