Showing posts with label home decoration. Show all posts

Friday, November 18, 2011

Easy kids' room updates can make winter less dreary


(ARA) - As temperatures drop and the days grow shorter, kids begin spending more and more time indoors. To help make spending time inside more enjoyable, give your child's room a fun makeover. With bright colors and fun details, you can transform a bland bed or playroom into a kid-friendly space they won't want to leave.


Color the walls

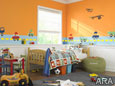
An easy way to inject color and personality into any room is with paint, and Dutch Boy's Crayola palette is perfect for creating a fun atmosphere. Kids can choose colors that match those in their crayon boxes, with names like Granny Smith Apple, Razzmatazz, Crayola Canary and Inch Worm. If you're in need of some extra creative inspiration, Dutch Boy's website offers a number of images and idea cards using color combinations from the Crayola palette. You can even download how-to painting instructions and coloring pages for the kids. And don't stop at the walls - paint dressers, chairs and other furniture bright colors to make the whole room pop. All 96 shades of the Crayola palette are available in Dutch Boy's popular Refresh line, so you're sure to find the perfect color to match your child's personality.


Canopy

To give your child's room unique flair, divide the space and add privacy, a canopy will do the trick. Whether store-bought or hand-made, a canopy can create a whimsical feel that your child will love. Drape your child's choice of lightweight fabrics from four ceiling hooks to create a customized cover for his or her bed. And while canopies are usually seen as bed accessories, don't think that's where they have to stay. Hang a version with a circular base and arrange plush cushions on the floor to create a comfy reading nook for your little one.


Chalkboard

Inspiring creativity and adding some fun to your child's room is as easy as A-B-C. With chalkboard paint, you can give your child a new way to practice the alphabet, arithmetic, drawing and much more. Simply cover a flat surface with a product like easy-spray Krylon Chalkboard Paint, let dry, and voila! For a standard message board, paint the backside of a bulletin board or other sturdy panel with a few coats of paint. Hang the board on the wall with a piece of colorful ribbon or set on an easel, and you've got an easy-to-clean way for kids to learn and play. You might even transform tabletops or toy box covers into chalkboards to give them more space to get creative.


Wall decals

Build on your child's new bright walls and give the room a more personalized feel with wall decals or stickers. These temporary art pieces are available in a wide range of sizes, shapes, designs and colors, and the options of kid-friendly styles are endless. From animals, to movie characters, to sports logos, to stars and flowers, there is sure to be a design or theme that matches any child's personality and age.  Because the stickers are easily removed, kids can simply transition to more traditional letters, mirrors, landscapes and silhouettes as they grow older. Some companies can even make decals from photos, so the design possibilities are truly limitless.


You can help your kids enjoy the great indoors this season and give their rooms new appeal with these few easy updates. Helping to plan and decorate their "new" rooms will also give your kids a sense of pride in the finished product, so they'll enjoy their spaces through the fall months and beyond.


Saturday, September 24, 2011

Poster Your Images

What do you have on your wall? Most people like to put up family pictures. My DH, he likes to put up posters with motivational quotations. For example, these are some sayings from his posters:
  • Think Out Of The Box.
  • Failing Doesnt' Make You A Failure. Giving Up Does!
  • Challenges Can Be Stepping Stones Or Stumbling Blocks. It's Just A Matter Of How You View Them.
  • Worry Is Like A Rocking Chair. It Gives You Something To Do But Doesn't Get You Anywhere.
  • Success Is What Happens When Preparation Meets Opportunity.
I've noticed that many people have started to think about Christmas gifts. You know what? A poster is a nice gift to give a friend. Maybe even a family member. Almost all of us have tons of images lying in our computer's hard disk. It is so easy to convert some of those images into custom posters. I know some of you are lucky to have a DSLR camera. I've seen plenty of awesome looking photos on blogs. Imagine adding some motivational words to an beautiful picture and then send it for custom poster printing. I think that makes a unique gift with a personal touch, don't you?

I know my son would love it if I converted some of his bird pictures into a poster. He is a budding birder. Here are some of his pictures:


Amazingly, poster printing is quite affordable. You could get a 24" x 36" poster printed for $19. It's a small price to pay for turning a lovely memory into a work of art.

Well, that's just a thought about what you can do with your tons of images and ideas for gifts.

*This post is brought to you by PosterBrain

Wednesday, December 08, 2010

How We Renovated Our Home

Finally, the stress of renovating, packing, moving and unpacking is about over. There is still some stuff to put away and picture frames to put up. The garden is also still work in progress. We had to really clear the garden from neglected plants, old pot stands, broken pots and other unwanted "stuff" left by the building contractors because there were so many mosquitoes. The mosquitoes are still around but less. My poor kids were bitten left, right and center.

Well, here are some before and after photos.

OUTSIDE VIEW

Before

After
We made the gate bigger so it would be easier for the 2nd car to park in the porch. Added an awning to keep out the sun. Changed the porch tiles. Changed the roof tiles too.

THE DRY KITCHEN
Before
After
We took out the wall tiles. Painted the walls yellow. Gave away the old cupboards and table. Put in a kitchen cabinet.

I didn't take a before photo for this part of the kitchen. Anyway, we put in cabinet doors underneath the counter top. Before, the cubicles were all open. Had to change the counter-top for the right side too because we changed the sink. That's why the right side is black and the left side is the old orange tiles.

THE WET KITCHEN
Before
When my mother renovated the house many, many years ago, she made this laundry room. The washing machine was here and she put bars near the ceiling so she could hang the clothes indoors.

After
I turned the laundry room into a wet kitchen. I put the washing machine outside. We cemented an area at the back and put an awning. So laundry is now outside.

My mom told me the workers were quite fascinated with this magnetic knife rack I bought from IKEA.

THE LIVING AREA
Before

After
We made the window smaller because that area was always hot in the afternoon. We changed the window pane to black color. Keeps the hot sun out and also gives us some privacy. We also changed the front door. It used to be a big, glass sliding door. Now we don't need curtains. And I don't need to bother washing any. Muaahahaha.
The floor went through some grinding so it nice and shiny now. We also changed the wall colors from blue to yellow. That really brightens up the house a bit.
The only thing we didn't take into consideration was the natural lighting in the house. Eliminating the big glass door and minimizing the window has made the inside of the house quite dark. DH was so focused on keeping the house cool and keeping the sun out, he didn't give much thought that we actually need some light to come in :) So, our electricity bill may be up a little because we have to turn on the lights during the daytime.

THE KIDDIE ROOM
Before

After
We put in floor tiles. Changed the window panes to dark color. Painted the walls a peachy color. It is not easy to select wall colors. The color may look nice on a chart but you don't really know how it is going to turn out. When I was choosing what colors to use, the painter and my mom kept suggesting that I use "bright" colors. Well, in the end the room looks quite ok BUT I think the kids would prefer a different color.
As you can see, no curtains here either. I don't know, should I put in some curtains?

BATHROOM

Before


After
Major changes here. Changed the wall and floor tiles. Changed the toilet too. Took out the bathtub. Installed a shower door and made that place a shower area. Cleared out all the clutter my mom had in the bathroom.

THE POND
Guess where most of my trophies ended up? Yeah, literally with the fish. There are 2 reasons for that: 1) Many of the trophies were damaged through wear and tear over the years. 2) We want to keep the inside of the house clutter free (as much as possible).
I thought I had to throw them away but DH had a better idea on how to recycle them.
So, if you want to see my golf achievements, we'll need to go see the fish.
p.s.: The ones where I took first place are NOT with the fish. I'm not that crazy.

THE RABBIT CAGE
The rabbits have a new home too. When my mom said she asked the contractor to build a rabbit hut, I didn't imagine it would be this big. Some people have suggested I put naughty children there too. Hehehehe.

Well, that's a peek to the renovation done on my house. Here are some lessons learned:
  • Even after getting a quotation from the contractor, be ready to spend more. Maybe even much more, especially if it is an old house. Renovating a new house is probably not as troublesome.
  • Get your house treated for termites regularly.
  • I got better service at an obscure tile shop than I did at a big name, widely advertised shop. The big shop had a lot of variety no doubt but that made it more confusing for me. I didn't know which were floor tiles or wall tiles and for which part of the house they were for. The lady boss at the obscure shop helped me make my choices. She would say, "let's start with the kitchen wall" and then show me my choices. After that she would guide me to choose the floor tiles to match the wall. I got the task done fairly quickly and organized.
  • Don't just think about making the house beautiful. It has got to be functional, practical and energy saving too. For example, DH chose white color for the exterior walls so it would reflect heat and keep the house cool.
  • Drainage is very important. Make sure the drains are not clogged with debris from the renovation.
  • Bathroom accessories are very expensive.
  • Make sure you keep track of how much you are paying the contractor. Ask for a receipt after each payment or just jot it down on paper and have them sign it.

Thursday, November 04, 2010

How To Liven Your Home With Window Decorative Film

If you did not know yet, I will be moving house shortly. We have been doing house renovations and my, oh my, what a task it has been. I know in the West, many people DIY their renovations. Although we hire people to do it, it is still quite a headache as we have to decide what we want done and then monitor the contractor to see that it is done properly. Not forgetting, the pain we feel in our pockets.

Anyway, when you have your own home, you want to make it as beautiful and comfy as possible. One way to liven up your home is with window decorative film. Read on for more info.

Decorative Accents For Windows and Glass Doors

Cocoa, FL - When it comes to decorating your home, there are many inexpensive ways to enhance a room. Currently popular are decorative accents for windows and glass doors using adhesive-free window films that look like etched or stained glass. In less than 15 minutes an ordinary window, glass door or mirror can be made to look as if it cost hundreds of dollars.

Adhesive-free static films are the best to use as they are easy to apply, look good and when its time to redecorate, are very easy to remove. EtchArt's Wallpaper For Windows has decorative Centerpiece, Corner and Border designs in a versatile assortment of etched glass and stained glass looks. In addition to windows and glass doors, they can be used on mirrors, glass dining and coffee tables, entertainment center doors, shower enclosures and many other glass surfaces around home or office. (Always try to avoid using decorative window films with adhesive, they are often cheap, can be difficult to apply and are definitely difficult to remove when it is time to redecorate.)

As the name implies, "Centerpiece" designs are used to create a central focal point. Stained Glass "Centerpieces" are primarily used on windows and glass doors. Etched Glass Centerpieces have a timeless look that is subtle and goes with all room decors.

Naples Centerpiece with matching Naples corners. An easy, way to decorate a window without blocking the view.

It's easy to find places to use "Corners". Corners can be used to "frame" a Centerpiece or to give a decorative accent to the corners of windows, glass doors, glass dining and coffee tables, mirrors and many other glass surfaces around the home or office.

Doral Corner – an easy way to dress-up a window, glass door, mirror, glass tables and more.

Etched Glass "Borders" are another way to upgrade the ordinary to the extraordinary. The most common use of "Borders" is across a window or mirror (static films are unaffected by steam and moisture and can be used on bathroom mirrors and shower enclosures). Placed across the middle of the glass, "Borders" are a decorative way to help avoid walking into sliding glass doors.

Eden Border decorating a mirror. Etched glass designs are an excellent way to decorate mirrors.

Decorating your windows, glass doors and mirrors with these decorative window film accents, is an inexpensive way to dress up a room without using table, shelf or wall space. An assortment of decorative accents can be found at www.WallpaperForWindows.com

** Wallpaper For Windows! is manufactured in Cocoa, FL USA by EtchArt, LLC using Made in the USA materials.