Friday, December 30, 2011

Pineapple Tart All Year Round

Now that Chinese New Year is only weeks away, you see all the CNY goodies out for sale. That includes the yummy pineapple tarts. I luuuurve pineapple tarts. My mom too and she has asked me several times to learn how to make it (so she can enjoy eating it).

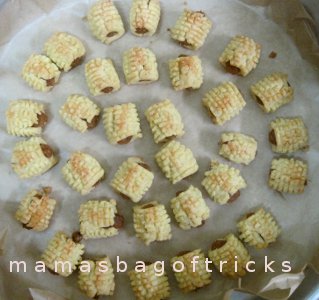
There's something about the Christmas season that gets me baking. So I finally picked up my lazy bones and attempted to make pineapple tarts. Finding the right recipe is very important. I settled to follow the recipe shared by Food 4 Tots (they have beautiful pictures too). So far I've tried baking this tart 3 times. The following are the tarts on my 3rd attempt.


After receiving valuable advice from pro pineapple tart bakers, I chose to combine margarine and butter to make the pastry. So now I have the kind of pastry that doesn't crumble in your hand but melts in your mouth.

Here's the recipe that I use for the pastry.
  • 150g margarine (Planta was recommended), 100g butter (At room temperature. Use unsalted butter if you want less salt).
  • 50g icing sugar
  • 2 egg yolks
  • 360g all purpose flour
  • 2 tbsp corn flour
  • 1/4tsp salt

Directions:
Use a mixer to cream butter and icing sugar (sift it first) until light.
Add in the egg yolks and the salt. Keep beating until fluffy.
In a separate bowl, sift the flour. Mix in the corn flour.
Fold in the dry ingredients (flour) gradually into the wet mixture (butter, sugar, eggs). You don't need to use a cake mixer here. Just use a spoon, wooden spatula or maybe even your fingers to mix everything into a firm dough.
Leave the dough aside for 30 minutes.

Okay, so that is the pastry. What about the pineapple filling? Well, I'm not so hardworking to grate the pineapple and cook it myself. I bought a packet of ready made from the DoReMi bakery here in Sikamat, S'ban. The sales girl said many people have tried it and said its good. She wasn't lying. Their filling was better than the one I bought at another bakery in town. That one was too sweet. The DoReMi one is not as sweet.

How to put the pineapple tart together? Just watch this video. Even a 5 year old can do it.

Basically, you take the pineapple jam and make little oblong balls. Do this while you are letting your dough rest.

To make the strips of dough, a pastry press helps. I got my plastic one at the bakery shop. Make sure you get the right pattern - one that makes stripes on the dough. I think it is called a Nastar mould.

After assembling the pineapple tarts, brush the tops with eggwash (1 egg yolk and 1 tbsp milk) and bake it for 15 minutes at 180 degrees celcius.

Mamas Baking Tips
  • Get your kids to help you roll the pineapple jam into balls. Older kids can help roll the pastry around the jam.
  • When your hands get sticky rolling the jam, just wash your hands. Clean hands makes the work easier and faster. This may mean you will be washing your hands a few times.
  • Use a baking sheet or grease paper to avoid the dough from sticking to the table surface.
  • To get them all about the same size, you have to have about the same measurement for each ball of jam. I used a 1/4 tsp to scoop up the jam. If you want bigger tarts, maybe 1/2 tsp of jam.
  • It is very tiring for one person to do it all. Get help if you can... grandma, kids or DH (I doubt he will say yes though). 
Now I can have pineapple tarts all year round. Woohoo! 

Oh, almost forgot... Happy New Year everyone.
Thursday, December 29, 2011

Terrific Thursday Freebie: MyMemories Scrapbook Kit

Are you ready to do some scrapbooking? Thanks to MyMemories, you can get these kits for free. Remember, the free kits change frequently. So if you want this particular one, you've got to download it this week. Next week, it is going to be a different one.

Here's the preview to this week's scrapbook kit:

 This pack includes 5 page elements and 2 quick pages.

You can get by clicking this link:

Although this freebie is courtesy of MyMemories, it is not a MyMemories Suite template. The elements and QuickPages are.png and the papers are .jpg format. You can use it with any software.

If you are looking for a digital scrapbook software, I highly recommend MyMemories Suite. It is very easy to use and it doesn't take long to learn how to use it. Version 3 was just launched. It is now better and has more features. You don't have to pay full price when you buy MyMemories Suite. Here's a discount code that will slash $10 off the price. Plus, you get another $10 gift certificate to buy stuff at their online store. Just copy and paste this code:
STMMMS86598


Here's where you can get the software:
MY MEMORIES SUITE: SOFTWARE FOR SCRAPBOOKING

I hope you enjoy this week's layout. If you don't want to run out of scrapbooking layout ideas, bookmark my website and come back every week for a fresh layout.

Tuesday, December 27, 2011

Keeping a Birthday Party Simple and Fun

By guest blogger: Melissa C.

My daughter just turned six last month, and I decided to go all out for her birthday. My husband and I rented a moon bounce for our backyard and hired a clown. We got some Mario Brothers party supplies and bought some extra controllers for our Wii, so all the kids could play their favorite video games when they got tired from jumping on the moon bounce.

The party was a lot of fun, but it wasn’t any more fun than far simpler birthday parties we’ve thrown. In fact, it was a little more stressful. Two kids bumped heads on the moon bounce and ended up crying. The clown scared one of the children, and that child hid in my daughter’s bedroom until the clown was done performing. Some of the children fought over taking turns to play video games.

I think my husband and I both realized this year that we’d prefer to keep things simple and spend less money for future birthday parties. In our experience, there are only a few essential things you need to make a birthday party a success. Here’s what they are:

1. A place for the kids to run around outside – Video games are good, but sunshine is better. Kids can play tag or Simon Says for hours, and they’ll love every moment of it.

2. An arts and crafts project – Schools have cut funding for the arts dramatically. My daughter only gets to go to art class once a week at her school. Kids really love to express themselves creativity and use their hands to make things. A group of kids is usually delighted by something as simple as making things out of Play-Doh.

3. A camera – Kids absolutely love to have their pictures taken with their friends and family members.

4. Parents – The birthday boy or girl obviously benefits from having his or her parents involved in the party. The parents of other children at the party are also a helpful addition. The more adults, the better. Adults can help keep the kids busy, safe, and entertained.

5. A homemade cake – Store-bought cakes don’t taste as good and often contain way more sugar than homemade cakes. Every child’s birthday party benefits from a cake baked from scratch, with love.

Monday, December 26, 2011

Tips for smooth and successful holiday travel


(ARA) - Planning a surprise visit to Grandma and Grandpa for the holidays or a family trip to celebrate the new year? Holiday travel can be stressful, but with some careful planning, it can be full of joy, instead of headaches. Check out these holiday travel tips to help you get through this busy time with ease.

* Avoid peak travel dates. You will often find the best prices and lowest numbers of travelers if you fly on the holiday itself instead of the day(s) before. If possible, travel on Christmas Day and New Year's Day, and avoid a return flight on the Sunday evening after a holiday weekend. Choose wisely the time of day you travel as well. As a rule, airports are least congested in the mornings and later at night.

* Be flexible and have a positive attitude. The No. 1 rule while traveling over the holidays is to be prepared for the unknown and have back-up plans. It's always smart to anticipate and plan for delays. Pack extra snacks, a good book, your cellphone charger, games for the kids and try to relax if you are faced with an unplanned event. Do not dread the flight. Children, even babies, pick up on tension, stress and anxiety and react to it. Be prepared and flexible, and take the opportunity to enjoy the journey and teach your kids new things. Point out new sounds, smells, people, scenes and even sizes of airplanes on the runway.

* Pack wisely. Decide well in advance of your flight if you will check or carry on your luggage and plan accordingly. If you decide to carry on, be sure to follow TSA rules about liquids and don't stuff your bag over its capacity. Kids can unknowingly delay you through security, so remember to always check kids' carry-on bags for any liquids, gels, etc. before you head out to the airport. If you opt to check luggage, be prepared to pay extra fees and again, pack as light as possible so you can manage your luggage.

* Carry on the essentials. Carry a backpack as your personal item in order to keep your hands free. Make sure it's filled with essentials for you and your family. The contents of your carry-on should cover hunger, thirst, boredom, spills, sickness, fear, tiredness and medical emergencies. Remember multiple diapers, an extra change of clothes and your little one's favorite stuffed animal. If you're traveling with an infant who is nursing, bring the new Boppy Travel Pillow. It's a full-sized, compact version of the award-winning original Boppy Pillow and is designed so Mom can feed baby comfortably anytime, anywhere. The Travel Boppy Pillow folds into a small and sleek travel bag and even snaps right on to a stroller and therefore is not considered an extra carry-on bag.

* Become a tech savvy traveler. Take advantage of technology. Whenever possible, print your boarding passes at home or use check-in kiosks. The earlier you check in, the better seats you will get. Think about doing your holiday shopping online and having your gifts shipped to your destination. This will cut down on luggage and the risk of gifts getting lost. Have the airlines send you an email or call you if your flight is delayed. Or, sign up for a service like Flight Tracker on your phone where you can get flight status updates within minutes. Make sure phones, music players, portable DVD players, etc. are fully charged and pack chargers for use at your destination.

* Make health a priority. Make sure that you and all family members wash hands, eat well and rest before you travel. Pack healthy snacks, hand sanitizer or wipes, tissues, etc.

* Leave early. Plan your journey to the airport accounting for enough time for long security lines, traffic, full parking lots, etc. and then give yourself an extra 30 minutes to help alleviate stress from any peripheral delays you may encounter.

* Practice makes perfect. If you're traveling with children, help to prepare them in advance for the journey by role playing and explaining things like removing shoes, putting all belongings (including blankets or stuffed animals) on the moving security belt, waiting patiently in line, etc.

If you do some planning in advance, you can arrive at your destination with a smile on your face instead of a headache.

Friday, December 23, 2011

You May Be Hurting Your Child With The Cry-It-Out Method

One of the challenges of parenting is teaching our kids to sleep on their own. One method introduced by Dr. Richard Ferber is called the Ferber method but is also commonly known as the cry-it-out method. The idea is for children to learn how to soothe their self to sleep.

Here's a little bit more about this Ferber method:
  • You can start when your baby is around 4-6 months. They need to be ready physically and emotionally.
  • Establish a bedtime routine to prepare baby to sleep.
  • Put baby in bed when he/she is still awake, then leave the room.
  • If the baby cries, do not go back to comfort immediately but after a predetermined time. The time in which you go in to comfort the baby gradually is extended. So for example, on the first night you go in after 3 minutes of crying. The second time after 5 minutes, and thereafter every 10 minutes until baby is asleep. The second night, the time intervals are extended longer. For example, 5 minutes-10 minutes - 12 minutes.
  • When you go in to comfort the baby, you do not pick the baby up or feed. Patting and reassuring is okay.
This idea of "progressive waiting" is sometimes misunderstood. Some parents interpret it as leaving the baby to cry it out until he/she falls asleep, even if the crying goes on for hours. Ferber actually doesn't advocate such practice. On the contrary, "progressive waiting" actually requires the parents to comfort their baby frequently and not just abandon the baby.

Ferber's method is liked by some and scowled by others. Some say that it is not healthy to let a child cry for very long hours. Well, they may be right about that.

You might be interested to read an article at Psychology Today entitled "Dangers of “Crying It Out”. Here's another article at Ask Dr.Sears called "Science Says: Excessive Crying Could Be Harmful".

I'll just highlight some points about how crying-it-out could harm the baby:
  • Neurons in the baby's brain die. 
  • We increase our baby's probability of having ADHD, experiencing poor school performance and antisocial behavior. 
  • The early stress could lead to health problems later like irritable bowel syndrome.
  • It undermines the baby's ability to self regulate. Let me give you a quote here:
    "When a baby gets scared and a parent holds and comforts him, the baby builds expectations for soothing, which get integrated into the ability to self comfort. Babies don't self-comfort in isolation. If they are left to cry alone, they learn to shut down in face of extensive distress--stop growing, stop feeling, stop trusting" (Henry & Wang, 1998).
  • Baby learns the world is not trustworthy and develops low confidence.
So, if you're wondering whether prolonged crying is good for your baby, here is something from the article you might want to ponder about:
"We know now that leaving babies to cry is a good way to make a less intelligent, less healthy but more anxious, uncooperative and alienated person who can pass the same or worse traits on to the next generation."
My parenting style leans more towards natural parenting. I had some people tell me that I shouldn't carry my babies too much or I might spoil them. I didn't do too well in listening to their advice. I used a sling and carried them often. I truly believe in the idea that our babies will be better off if we meet their needs instead of trying to teach them independence that early in life. Here is another quote from the Psychology Today article:
"We can confirm now that forcing "independence" on a baby leads to greater dependence. Instead, giving babies what they need leads to greater independence later."

So, what is your take on this? Have you tried the cry-it-out method in putting your baby to sleep? Do you agree that letting your baby cry it out is harmful or do you think that we can "spoil" the baby if always give in to their crying? 

Thursday, December 22, 2011

Terrific Thursday Freebie: MyMemories Scrapbook Kit

Here's your free scrapbook kit today from MyMemories. Remember, the free kits change frequently. So if you want this particular one, you've got to download it this week. Next week, it is going to be a different one.

Here's the preview to this week's scrapbook kit:

 This pack includes 2 digital papers, 5 page elements and 2 quick pages.

You can get by clicking this link:

Although this freebie is courtesy of MyMemories, it is not a MyMemories Suite template. The elements and QuickPages are.png and the papers are .jpg format. You can use it with any software.

You can quickly scrapbook a page with quick pages. After all, that's why it called "quick" pages.  You just need to plop in your photos and you're done. Of course you can add in more embellishments if you want. The 2 quick pages offered here makes a matching 2 page layout.

I find MyMemories Suite very easy to use. Version 3 was just launched. It is now better and has more features. You don't have to pay full price when you buy MyMemories Suite. Here's a discount code that will slash $10 off the price. Plus, you get another $10 gift certificate to buy stuff at their online store. Just copy and paste this code:
STMMMS86598

Here's where you can get the software:
MY MEMORIES SUITE: SOFTWARE FOR SCRAPBOOKING

Wednesday, December 21, 2011

Cute Dad Shows You How To Use A Baby Sling


This video has caused many mommy's hearts to flutter a bit. When it comes to babywearing, it is usually the mom who does it. You don't see many videos of dads demonstrating how to use a baby sling. Plus, almost everyone is agreeing that he is a hottie. Are you thinking the same?

Anyway, I posted this video here coz' I think this is a great inspiration to all dads. I've tried using the long baby sling wrap similar to what this dad is using. It has its good and bad points.

Good:
  • Feels nice and snug. It holds baby very well.
  • The weight distributes evenly on both shoulders. You won't feel any stress on the shoulders or back.
  • You can hold baby several ways: cradle, on the hip, on the back.

Bad:
  • The cloth is very long. It is a problem if you need to put it on in the parking lot or at the store as it hits the floor and might get dirty.
  • Not so suitable anymore when baby is bigger and heavier. The baby's weight will stretch the cloth a bit. You have to tie the cloth extra snug then.
  • If you are carrying your newborn in a cradle position, make sure his head doesn't get buried and the baby's airway is always clear. There is the danger of suffocation.
Some dads may think this kind of sling is a little troublesome to put on and take off. If you want to encourage your hubby to use a baby sling, it might help to get a sling that is simple to use and doesn't look to "girly". The Ergo Baby Carrier has many designs that are suitable for dads. Click on the link for my detailed review.

So, is your hubby open to using a baby sling? What kind of baby sling works best for you and hubby?

Tuesday, December 20, 2011

Rambutan Picnics

My kids are very excited that the rambutans on our tree are starting to turn red. Actually, I'm the most excited. I've fond memories of feasting under this tree as a child. Of course, eating too much I would always end up coughing.

Well, my son caught me under the tree munching my heart out and whined "why didn't you invite me?" I then made a date with my kids to meet me under the rambutan tree at 5pm the next day. When the time came for our date, I walked out onto the garden and saw this (the picture above) greeting me. The kids brought out the picnic carpets and umbrellas (even though it wasn't hot) and was ready for their rambutan picnic.

Of course I had to do all the work and open the rambutans for them to eat. BUT it was an enjoyable time. There are still more rambutans turning red and I still sneak out to have a little snack. Although the recommended way to eat is to pluck a whole bunch, open them, wash them and chill them in the fridge, I feel they taste best and sweetest when eaten under the rambutan tree. I'm sure the mosquitoes agree I taste best that way too :)


MAMAS PARENTING TIP
  • It doesn't take much to make your children happy. 
  • You don't need to spend a lot of money to make memories.
p.s: If you've never had rambutans before, you need to make a trip to Malaysia. We've got lots of yummy fruits. They are seasonal though so make sure you come at the right time.

Monday, December 19, 2011

Blast away the 'Mom, I'm bored' winter break blues

(ARA) - Winter break from school used to mean a few lazy weeks spent indoors until boredom hit. This holiday season, parents can transform their family's winter break blues into excitement by offering children what they crave - fun and engaging activities that will keep their minds active (and they won't even know it).

As crazy as the holiday season can be, there are simple solutions for families who want to continue to exercise their children's minds and bodies during the winter break and beyond with age-appropriate, fun activities.

Be a camper
Seasonal camps, such as summer or winter camps, are specifically designed to offer a balance of fun and continued learning during transitional periods from school. While engaging children in activities they love, seasonal camps provide a simple solution for families who may need to work or simply catch up on holiday shopping and errands.

KinderCare, for example, offers a winter camp for both preschool and school-age children during the last two weeks in December. Children can explore the science of chemical reactions and learn about the magic of flight through educational and hands-on themed activities, including "Bubble Trouble," "Volcano Blast,"  "Helicopter Propellers," and "Balloon Rockets."  KinderCare's winter camp activities also reinforce core learning areas such as language arts, math, science and creative expression.

Capture holiday memories through reading and writing
The holidays are a time to capture special memories when families spend more time together. Nothing is better than snuggling up to a great book with your child. Creating a holiday journal is another excellent way to preserve memories while participating in a creative, family-friendly activity.  Studies have shown that even younger children enjoy exploring writing and that their scribbles and scrawls have meaning to them. This type of writing is called prewriting and it helps children develop language and literacy skills.

There are simple ways to foster children's creativity and inspire them to write during the holidays.

* Encourage "writing for a reason." Make writing a part of daily life whether writing holiday shopping lists together, writing brief descriptions of holiday pictures or photos, or planning holiday food menus together.

* Invite your child to dictate his or her story into a tape recorder, then write the story down and read it back to your child.

* Inspire an art book by encouraging your child to draw holiday memories. Then ask your child to describe his or her pictures and help him or her write the story that goes with the pictures.

"Focus on the intended meaning of what your child is trying to write instead of the appearance of the writing," explains Megan Riede, senior director of education programs for KinderCare. "Not only does this create bonding opportunities, but it also allows for new ways to support your child's learning during the holiday season."

Turn holiday chores into holiday cheer
Believe it or not, it's easy to turn seemingly daunting holiday tasks like cooking, decorating and wrapping gifts into family fun time.  Think about creating kid-friendly games and activities out of your seasonal chores so that you can spend quality time together while checking off your to-do list. Each of these activities introduces children to more than just the task at hand.

1. Cooking and baking exposes children to measurements, mixing, and the properties of solids and liquids which help them learn about math and science. For example, you could ask your child to measure a cup of flour or show him or her how water and oil separate when in a bowl.

2. Wrapping packages can be an opportunity to discover and identify different shapes, sizes and patterns, as well as practice eye-hand coordination. For example, ask, "Which package is the biggest?" or "Which box is round in shape and which one is square in shape?"  Have your child practice wrapping a gift for someone in the family with a pre-cut piece of wrapping paper.

The holiday season is a perfect opportunity to bond and make memories with loved ones while learning together. Whatever families choose to do this winter break, look for ways to expose your children to a myriad of age-appropriate activities that allow them to imagine, explore, have fun and keep learning while sharing in the holidays.

Friday, December 16, 2011

Sweet and Sour Sesame Chicken


Cracking your head on what to cook for lunch or dinner? Add this dish to your menu: Sweet and Sour Sesame Chicken.

I found the recipe here and it tastes soooooo goooooood. Even my mom who hates to eat chicken breast meat said it was yummy. She even suggested that I add this dish to our Christmas and Chinese New Year dinner menu. It is not that difficult to do. Maybe just require some time to fry the chicken.

Okay, so if you're lazy to head over to BlogChef's website, here's a quick look at the recipe.

INGREDIENTS:

  • Chicken breast
  • Raw sesame seed
  • Spring onions (optional. some kids don't like it)

For marinade:
  • 1 tsp chicken base - you can use crushed chicken bullion cubes. I used Maggi's concentrated chicken stock that comes in a bottle. 
  • 1/4 tsp salt
  • 1/2 tsp sesame oil
  • Ground white pepper
  • 1/4 tsp sugar
  • 1 tbs fruit flavored wine (I omitted this coz' I don't have it. It was still super yummy).

For batter:
  • 1/2 cup all purpose flour
  • 1 tsp baking powder
  • Beat 1 egg
  • 1/2 cup water
  • 3 tbs cornstarch
  • Pinch of salt
  • 1 tbs vegetable oil

(The batter is not very thick. It is quite runny but it is thick enough to coat the chicken)

For sauce:
  • 3 tbs honey
  • 2 tbs sugar
  • Salt
  • 2 tbs ketchup 
  • 1 tbs distilled vinegar
  • Ground black pepper
(When I was cooking, I asked my 10 year old daughter to put the sauce together. She did a great job. So, if you have older kids, you can encourage them to help you in the kitchen. Oh, I forgot to tell her about standard measurements. So she was using our dining tablespoon and heaping in the sugar. Thank goodness I stopped her just in time. Don't forget to tell your kids about using standard measuring tools when following a recipe.)

    STEP 1: Marinade the chicken.
    Cut up chicken breast into bite size or strips.  Mix in the marinade ingredients. I marinated mine overnight but 1/2 hour is also okay.

    STEP 2: Fry the chicken.
    Dip the chicken into the batter and then fry in oil. Ideally you dip the chicken one by one before frying it. If you want to be quick, you can do what I did: I just poured the batter over the chicken meat and mixed it all up. Worked out okay for me. Fry till golden brown, maybe about 10 minutes depending on how hot your oil is. I prefer a medium fire. Too hot and the outside gets burned before the inside is cooked. Set the fried chicken pieces aside and drain the oil on paper towels.

    STEP 3: Mix in the sauce.
    Heat up the sauce for a few minutes. Stir until the sugar melts and sauce thickens slightly. Then dump in the fried chicken and mix it up with the sauce. Make sure everything is coated. Turn off the fire and sprinkle in the sesame seeds and chopped spring onions.

    ENJOY!
    Hope your family likes it as much as we do.

    Thursday, December 15, 2011

    Terrific Thursday Freebie: MyMemories Scrapbook Kit

    It is freebie day. Download this week's free scrapbook kit and start scrapping away. Remember, the free kits change frequently. So if you want this particular one, you've got to download it this week. Next week, it is going to be a different one.

    Here's the preview to this week's scrapbook kit:

     This kit includes 2 digital papers, 3 page elements and 2 quick pages.
    Although this freebie is courtesy of MyMemories, it is not a MyMemories Suite template. The elements and QuickPages are.png and the papers are .jpg format. You can use it with any software.

    You can get by clicking this link:


    I have been using MyMemories Suite to do my scrapbooks and I love it. It really makes scrapbooking simple. The version 3 was just launched. It is now better and has more features. You don't have to pay full price when you buy MyMemories Suite. Here's a discount code that will slash $10 off the price. Plus, you get another $10 gift certificate to buy stuff at their online store. Just copy and paste this code:
    STMMMS86598

    Here's where you can get the software:
    MY MEMORIES SUITE: SOFTWARE FOR SCRAPBOOKING
    (Remember to use the discount code).

    Happy Scrappin!

    Monday, December 12, 2011

    Five no-tech, imagination-boosting toys every child should have


    (ARA) - Every year, lists fly around the Internet and airwaves, parents line up in stores and everyone talks about what the season's hottest toys will be. All the chatter can make it seem like everyone's forgotten the single most enduring "toy" at the disposal of every child - imagination.

    Plenty of high-tech toys encourage creativity, but to really fire up a child's imagination it's hard to beat the power of timeless, classic toys that rely on a child's interaction rather than on electronics. This type of nostalgic toy can become a child's best friend, and parents will be happy their children have something that doesn't require batteries and doesn't stop working just because it's dropped a few times.

    Here are five timeless, nostalgic, low-tech toys that every child should have:

    1. A classic doll - Countless generations of little girls have fallen in love with a special doll. This is one toy that can serve many functions, from best friend and confidante to teacher and even role model. If some of today's brash, in-your-face styles of dolls leave you shaking your head, never fear: you can still find dolls that offer contemporary appeal combined with more homespun values. Cracker Barrel Old Country Store, the popular family restaurant/retail store found across the country, recently introduced a line of rag dolls called Butterflies. Soft and cuddly, these 15-inch dolls of relatable characters, such as a ballerina, princess, cheerleader and schoolgirl, make a wholesome, imagination-inspiring addition to a little girl's toy box. Visit www.crackerbarrel.com/store/butterflies/ to learn more.

    2. A wagon - Whether it's an old-fashioned metal one in fire-engine red or one of the modern, SUV-sized plastic numbers available today, nothing beats a wagon for getting kids moving. It's also a toy that can keep pace with a child's development and changing styles of play. Very young children will enjoy riding as parents tow them along on trips to the park or walks around the neighborhood. As children grow, they begin to use the wagon themselves, employing it to transport toys or other children. Turn it over and it's a makeshift fort or castle.

    3. A building set - Whether it's plastic, wood, or metal, a building set can fire the imagination of budding engineers. Building materials that link together have a leg up on old-fashioned blocks, allowing kids to create increasingly complex structures. With so many different construction toys available, it's possible to find a building set for virtually any age or skill level.

    4. Dress-up items - Pretend play is an important way children explore their own potential. Dressing up as a doctor, nurse, firefighter or police officer helps children learn about career choices and adult roles, and facilitates creativity through role playing. Creating a dress-up chest is simple and low-cost. Parents can fill a plastic bin with hand-me-downs, old Halloween costumes and even a few store-bought items.

    5. An easel and drawing pad - Sure, coloring books are great, but there's something about an easel that makes a child feel like a real artist. A simple wooden frame holding a large drawing pad can become the launch pad for flights of fancy rendered in crayon, watercolor and even washable magic marker. Whatever your child's media or favorite subject, putting him or her in front of an easel will enhance enjoyment of the artistic experience - and give you a bird's-eye view of your budding artist at work.

    Imagination is truly the greatest toy - and tool - of childhood. Fortunately, you can find plenty of "no-tech" toys to nourish your child's creativity and imagination, even in today's high-tech world.

    Thursday, December 08, 2011

    Terrific Thursday Freebie: MyMemories Scrapbook Kit

    Scrapbook enthusiasts, are you ready for another freebie? Here is this week's free digital scrapbook kit. 
    Remember, the free kits change frequently. So if you want this particular one, you've got to download it this week. Next week, it is going to be a different one.

    Here's the preview to this week's scrapbook kit:

     This kit includes 2 digital papers, 7 page elements and 2 quick pages.

    You can get by clicking this link:

    Although this freebie is courtesy of MyMemories, it is not a MyMemories Suite template. The elements and QuickPages are.png and the papers are .jpg format. You can use it with any software.

    I find MyMemories Suite very easy to use. Version 3 was just launched. It is now better and has more features. You don't have to pay full price when you buy MyMemories Suite. Here's a discount code that will slash $10 off the price. Plus, you get another $10 gift certificate to buy stuff at their online store. Just copy and paste this code:
    STMMMS86598

    Here's where you can get the software:
    MY MEMORIES SUITE: SOFTWARE FOR SCRAPBOOKING

    Wednesday, December 07, 2011

    My Favorite Child Is...


    Came across this news bit asking if we, as parents, have a favorite child? It got me thinking... do I have a favorite child?

    Well, I do. My favorite child is......... whoever is obedient and not giving me a headache at the moment. Hahahahah. So I guess my favorite child could change minute to minute, hour to hour and day to day.

    In all seriousness, I don't think I have a favorite child. Each of my 4 children have their own strengths and weaknesses. Each of them give me joy and stress in different ways. They each have their own way of making me smile. Each have also contributed to my head of grey hairs. I would be devastated if anything bad were to happen to any child of mine. They are all important to me and I could not choose to love one more than another. But I admit, that it is easier to feel love for a child who is not throwing a tantrum and screaming the house down. However, I do not have favorites.

    I DON'T try to treat my children equally. I don't think that is possible. I learned by observing a good friend of mine that we care for our children according to their needs. If one child of mine is going through a rough time and needs more attention, then I will give more attention to that child. At the same time, I try not to ignore the other children. I explain to them that their sibling needs some extra help and ask that they support me in giving that help. Being fair is not about children receiving the same treatment and attention but receiving the treatment and attention that is befitting their needs.

    Here are some things I do to not play favorites:
    • Don't always protect the younger ones and blame the older ones. 
    • Reward according to works. Good works must not go unnoticed. 
    • Hug time at the end of the day. Everyone gets a turn.
    • Consensus. Rope in the opinion and consent of all siblings in certain decisions. For example, every time one of my children want to use the computer, he/she needs to ask the siblings' permission too besides mom's permission.
    • Don't just call the oldest to help out with the chores (or only the girls). Everyone must help according to their capabilities. 
    So, what do you think of the news bit? And do you have a favorite child?

    Tuesday, December 06, 2011

    Let Me Win Mommy


    The last few days, our family has been playing Monopoly Deal. I bought the game so the kids won't spend too much time on the computer. My youngest son D2 really loves the game. Unfortunately, being only 4 years old, he isn't as "cunning" as his older siblings or dad. So he hasn't won a game yet. He knows the rules and stuff, he just hasn't learned how to strategize and plan winning moves.

    It is quite heartbreaking for him when we "steal" his property or take away all the money in his bank. When someone else wins, he would put on his sad puppy face. Trying to comfort him, I would remind him it is just a game.

    The other day as I was comforting him, he said "you must let me win the game."

    My answer?   "Sorry son, I cannot let you win. You have to learn how to win".

    Although I know letting him win will make him happy, I don't think I'm helping him that way. I believe I should teach him that that losing can be a stepping stone towards success one day. Success is also sweeter when you earn it on your own. Plus, it is important to learn how to be a gracious loser. Being a good sport is important too. Hopefully he understands the lesson I'm trying to teach him by not letting him win.

    What about you? Would you purposely let your children win? What's your take on this?

    Monday, December 05, 2011

    Make your home glisten with sparkling new holiday craft ideas

    (ARA) - Time to deck the halls, don that holiday spirit and prepare your home for festivities.

    But do your tightened purse strings have you saying "bah humbug?" Luckily, creating exquisite holiday decor can be fun and cost-effective when you do it yourself. Here are a few amazing holiday craft ideas that are simple and sensational.

    Glittered holiday pinecones
    Create a beautiful centerpiece with items that you might find in your backyard - all in less than an hour. Here's what you'll need: pinecones, Krylon Primer and Krylon Glitter Blast glitter spray, fishing line and a drop cloth.

    Make sure that the pinecones are clean from dirt and dust, then tie fishing line around the stem of the pinecone. Hang them from above so that all surfaces are accessible with the drop cloth underneath. Next, simply spray a coat of primer and let dry and then spray with your favorite glitter color of Glitter Blast. Soon, you'll have pretty pinecones ready to spruce up any table.

    Colorful cones
    Decorate your home with a festive holiday cone. Let your imagination run wild with these cheerful creations. Here's what you may need: various sized foam cones, Glitter Blast glitter spray, scrapbook papers, self-adhesive foam sheet, sequins and pins, ribbon, paste and acrylic jewels.

    To start, thoroughly spray the cones with your favorite colors of Glitter Blast and allow to completely dry. Then, follow these guidelines to create three unique versions.

    Polka dot cone. Punch out a variety of sizes and colors of circles from scrapbook papers and foam sheets and attach in random patterns to the cone using the paste. Start with larger-sized circles and gradually adhere smaller sizes on top. Finally, pin on 1-inch glitter sequins.

    Ribbon cone. Spiral ribbon around cone, anchoring in place with craft glue and craft pins. Cut small snips in the edges so ribbon will lay flat. Glue and pin sequin trim in between the ribbon spirals.

    Beaded cone. Using straight pins, pin sequins at random all over the cone. Then use paste to attach flat-backed acrylic jewels in and around the sequins.

    To complete the look of each uniquely designed holiday cone, make a hole in the very top of the cone with a pencil point. Press the neck of a small tree ornament into the hole and secure with a drop of glue. Now you have three beautiful and original cones for a creative and colorful arrangement.

    Original ornaments
    You may have had sticker shock the last time you shopped for holiday ornaments - but luckily with some inspiration from renowned crafter and author, Mark Montano, you can update your tree for almost free when you design your own. Here's what you'll need: eight wooden clothespins, cardboard, scissors, glue, spray paint, large rhinestones, hot glue gun and glue sticks, fishing wire and loose glitter or Glitter Blast glitter spray.

    To start, take the clothespins apart and arrange the wood pieces in a starburst pattern with the fat ends of the pieces touching in the center and the skinny ends forming the points. Cut out two 2 1/2 inch cardboard circles. Glue a cardboard circle in the center of the clothespins and let it dry. Flip your starburst over, glue the other cardboard circle in the center and let it dry. Next, spray paint the entire ornament in a color of your choice. Cover the cardboard and about half an inch of the surrounding clothespins with glue and sprinkle glitter on top - or use Glitter Blast glitter spray. Flip the starburst over and repeat. When dry, use hot glue to adhere a rhinestone in the center of both sides. For the hanger, fold a 10-inch piece of fishing wire in half and hot glue the ends to one of the clothespins. Once dry, hang on your tree and enjoy.

    For more holiday craft ideas from Krylon, visit www.yourholidaystyle.com; for craft ideas from Mark Montano, visit http://markmontanoblogs.blogspot.com/.

    Friday, December 02, 2011

    Terrific Thursday Freebie: MyMemories Scrapbook Kit

    It is Thursday again. That mean it is time to give you another digital scrapbook kit freebie. Don't just download and keep it hidden on your hard disk. Scrap away and share with me and everyone your beautiful work. Leave a comment at the bottom and a link so we can see what you did.
    Remember, the free kits change frequently. So if you want this particular one, you've got to download it this week. Next week, it is going to be a different one.

    Here's the preview to this week's scrapbook kit:

     This digital kit includes 2 digital papers, 3 page elements and 2 quick pages.

    You can get by clicking this link:

    Exciting news...  MyMemories Suite has a new version out. They recently launched MyMemories Suite V3! If you have V2, it is time to upgrade. V3 has new features and designs. This is really one of the best scrapbook software out there.
    You don't have to pay full price when you buy MyMemories Suite. Here's a discount code that will slash $10 off the price. Plus, you get another $10 gift certificate to buy stuff at their online store. Just copy and paste this code:
    STMMMS86598

    Here's where you can get the software:
    MY MEMORIES SUITE: SOFTWARE FOR SCRAPBOOKING